
Example tutorial for creating a necklace bluetooth controller with a pressure sensor that triggers shape changing and sound effects in VR.


What is needed
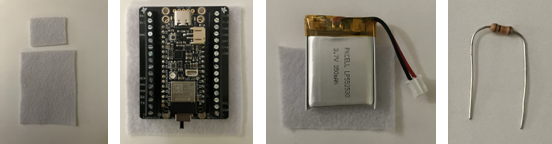
Supplies
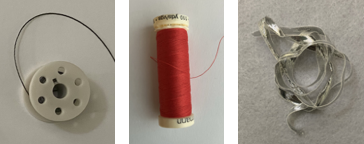
- Regular Thread
- Foam Sheet
- Velostat
- Conductive Thread
- Conductive Fabric Tape
- 3.4V Lithium Battery
- LED
- Adafruit ESP32 V2 Board
- TermBlock FeatherWing
- 10k Ohm Resistor
- 2x M-M Wires
- USB-C to USB cable
Tools
- Meta Quest 2 headset
- Small screwdriver
- Sewing needle
Step by Step
Part 1. Pressure Sensor
Wearable pressure sensors are made with velostat, a conductive sheet that can act as a variable resistor when experiencing changing pressure. To incorporate velostat into your circuit, expose one side with positive current and the other with negative. Use serially like any other resistor.
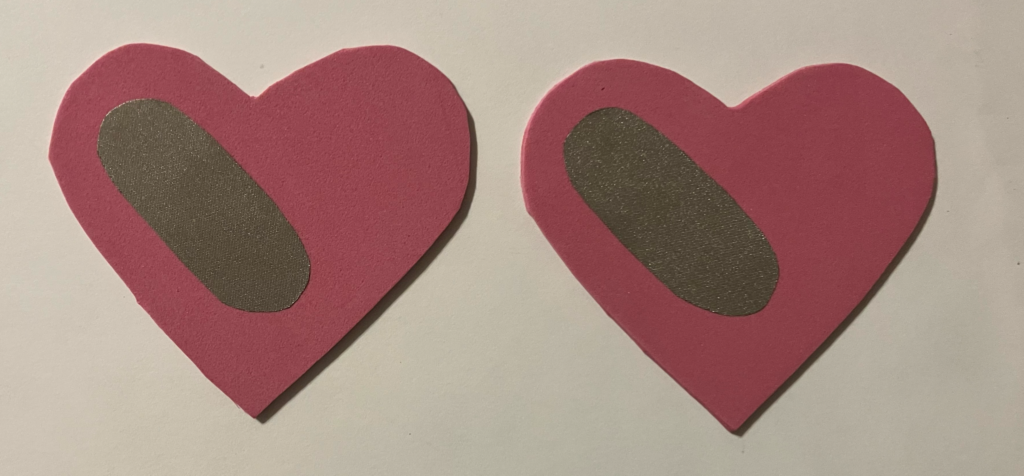
Step 1: Gather and cut out materials
To create your heart controller, you will first need to cut out your materials: a square of velostat, 2 conductive tape ovals, and 2 foam hearts.

Step 2: Attach conductive tape to foam
Peel off the back of your conductive tape and stick the foam heart with one end in the center, and the other up to one side. The conductive tape should be oriented the same way on both hearts.
If you do not have conductive tape, you can attach other conductive fabrics by sewing these into place with regular, non-conductive thread.
Step 3: Attach conductive thread.
Next sew conductive thread to the top end of your conductive tape. Sew around the top a few times for luck and then sew up to the top of your heart. Without tying a knot at the end, leave out the excess thread for later.
If using foam, you can hide these stitches by pushing the needle only halfway through the material.
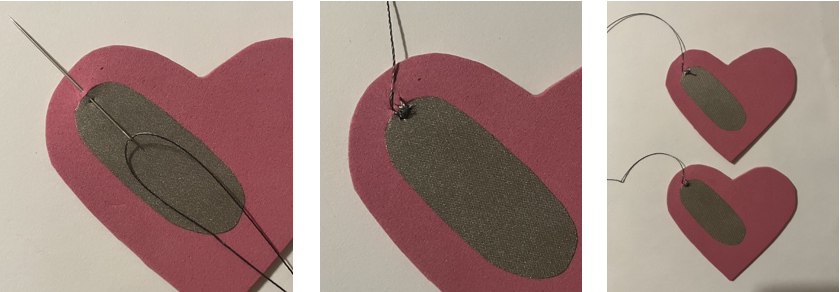
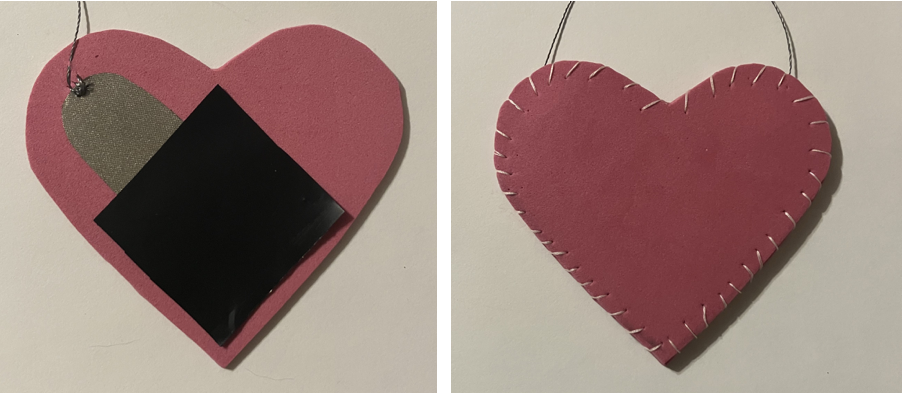
Step 4: Sandwich the velostat.
Place your velostat square diagonally in the middle of one heart. Then, flip the other heart and place over top. Internally, the conductive tapes are facing opposite directions, separating the positive and negative ends of the circuit. Note that you do not need to sew your velostat in place, as this can affect its functionality. (?)
Finish off by sewing the hearts together with regular thread along the perimeter. Make sure to leave the extra ends of conductive thread outside your heart.
Step 6: Test.
Before proceeding to Part 2, give your soft pressure sensor a quick test via a simple LED circuit. Attach the positive end of your battery to one of the exposed, conductive threads. Then attach the positive end of your LED to the other thread. Lastly, attach the negative end of the LED, to the negative end of your battery.
If completed successfully, the LED should turn on when the middle of your heart is pressed, gradually brightening with more pressure.

Part 2. ESP Board, Circuit and Arduino Script
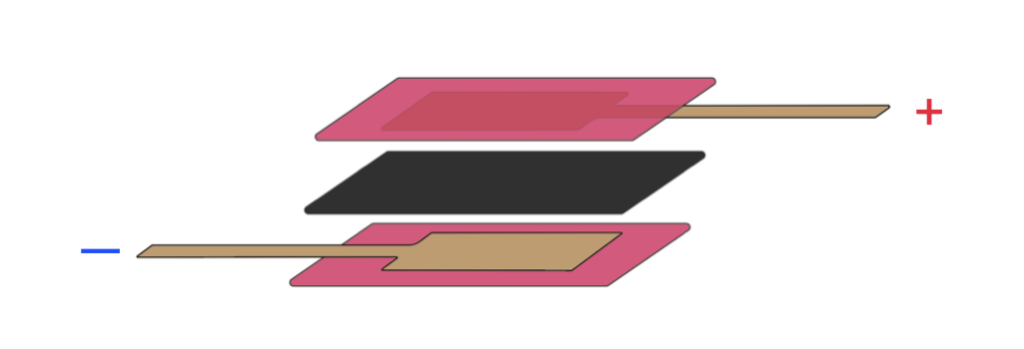
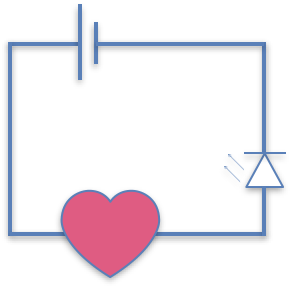
To connect our pressure sensor with the ESP Board, we will be creating a soft version of the below circuit.

Step 1: Gather and cut materials
For this next part, we will be using the ESP32 board connected to a TermBlock FeatherWing, 2 felt rectangles, a 10K Ohm resistor, a 3.7V battery, regular and conductive thread, and a ribbon. The larger felt rectangle should be slightly larger than the TermBlock FeatherWing, while the smaller felt should be slightly larger than the battery pack.
Step 2. Attach felt rectangles.
Using non conductive thread, sew the left, right, and bottom sides of the smaller rectangle to the middle of the larger rectangle. This will be used as a pocket for holding the battery.
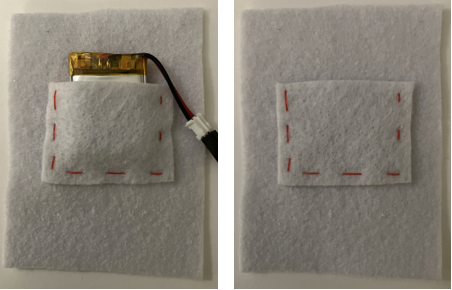
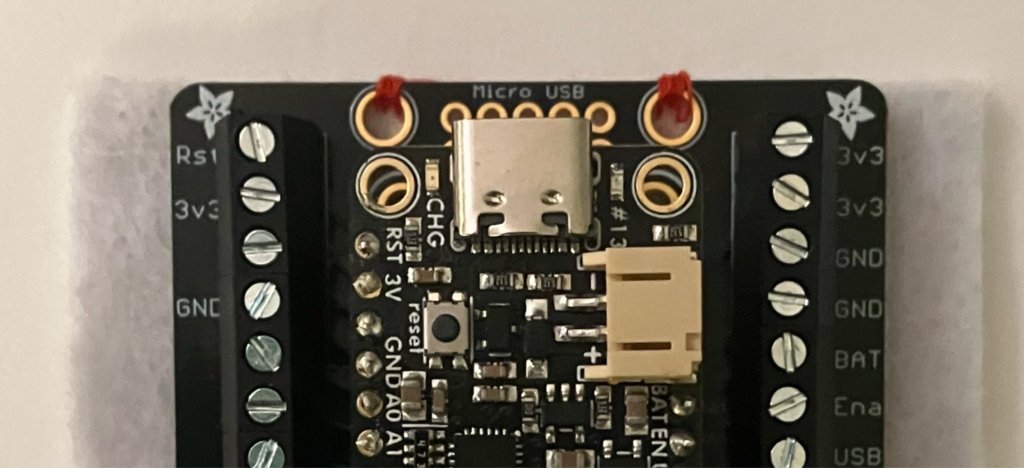
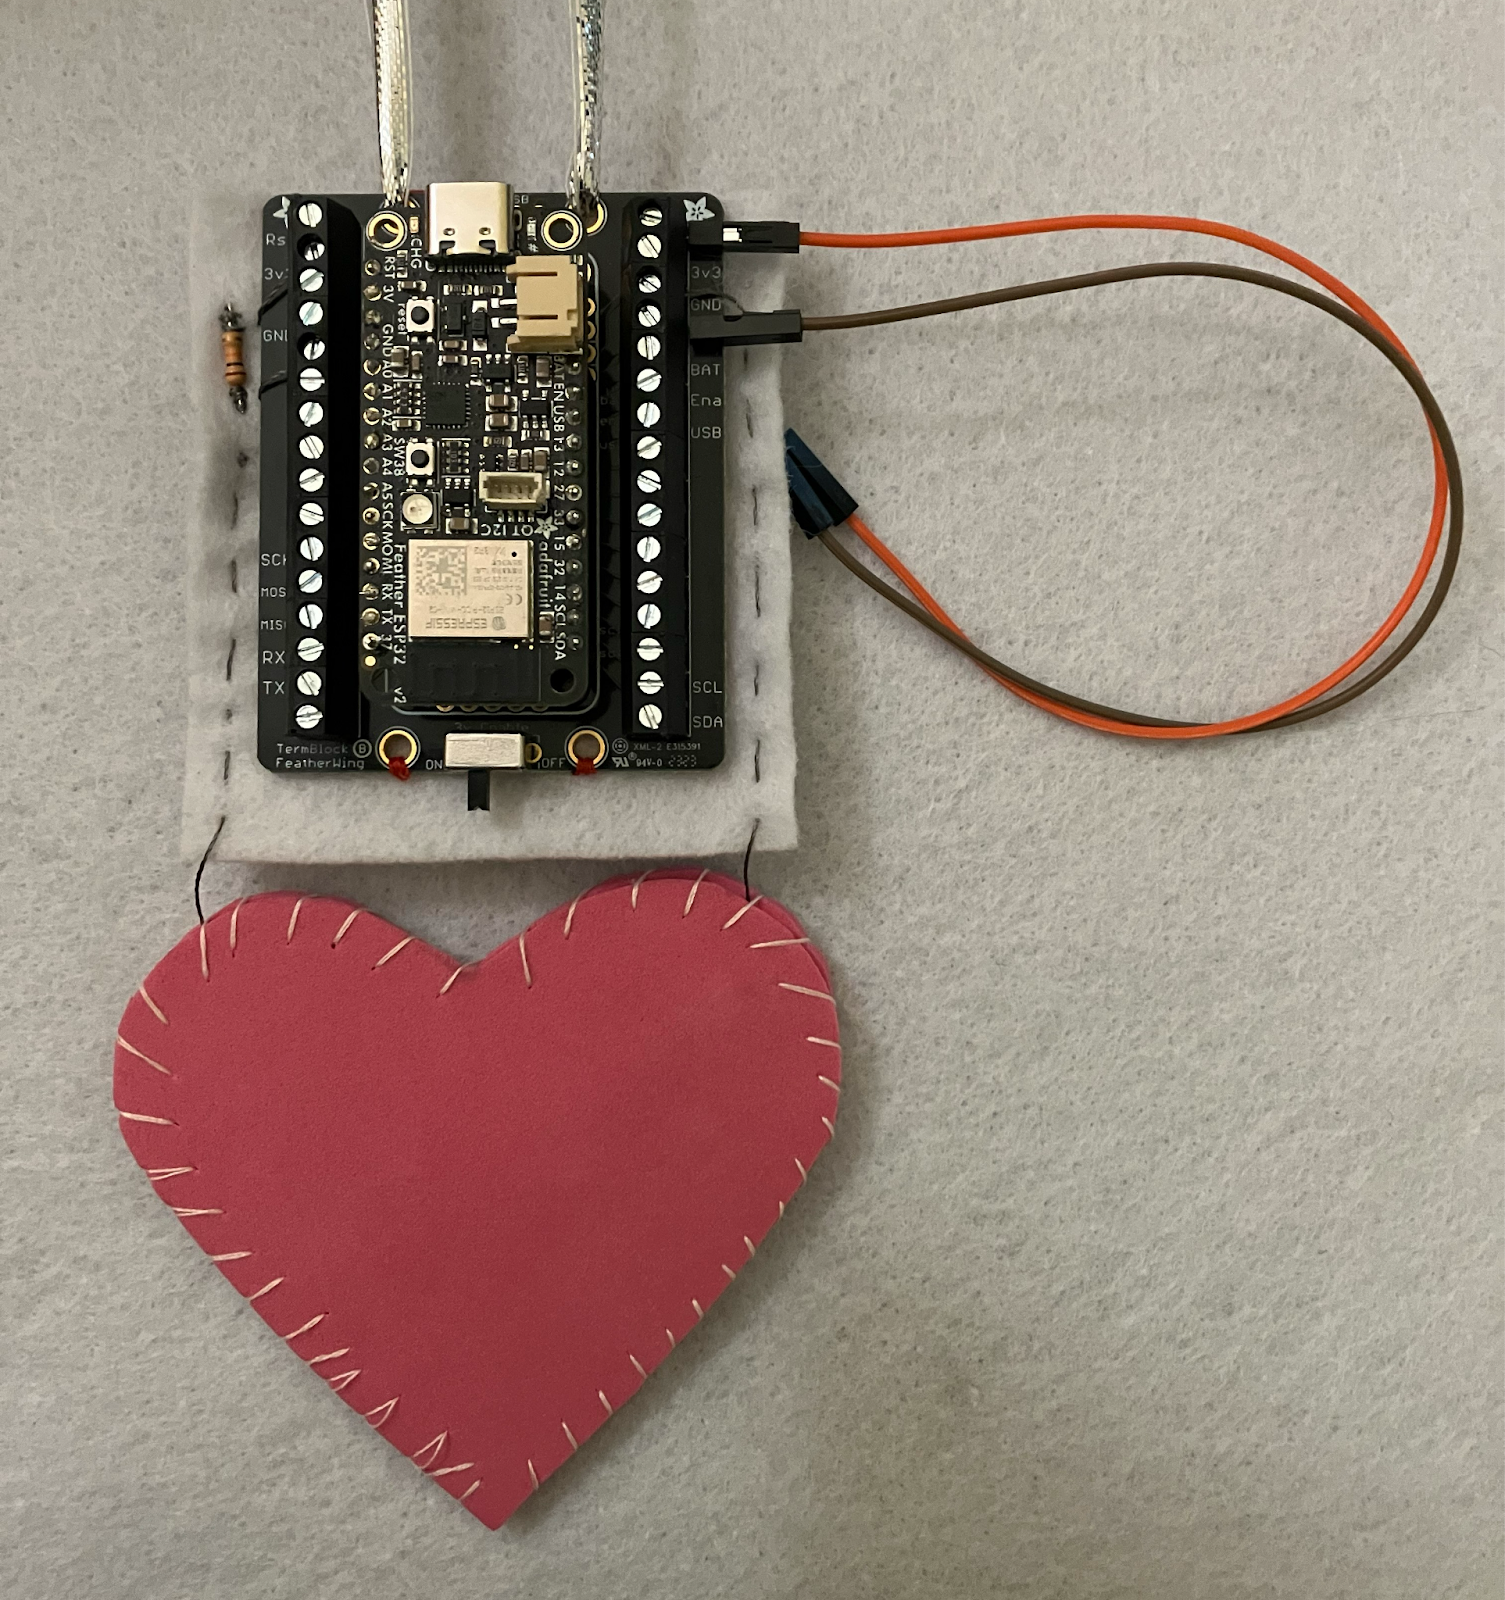
Step 3: Attach TermBlock FeatherWing board to felt.
Flip the felt so the pocket is at the back. Secure your board to the felt by sewing around the board’s four large holes. Using the upper two holes, string your ribbon through the felt (with a needle or by making a small incision) so the board can be tied around your neck.
Step 4: Sew down resistor.
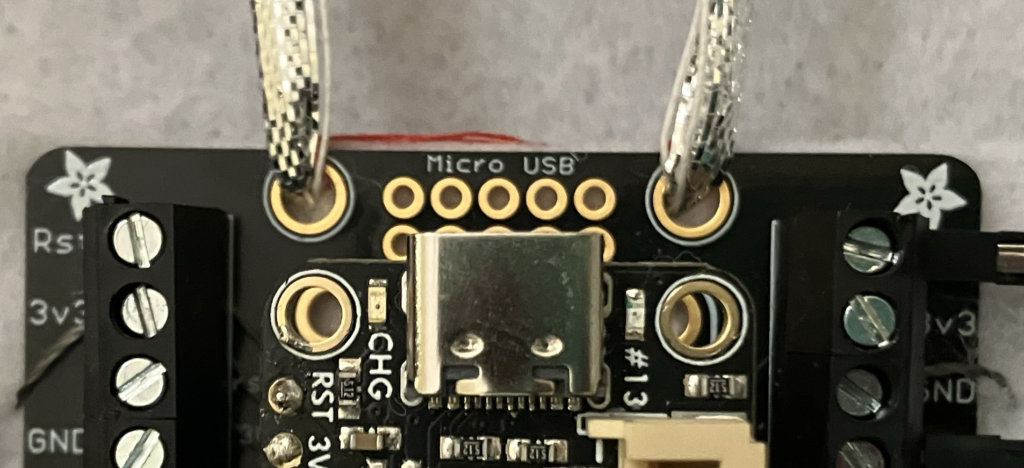
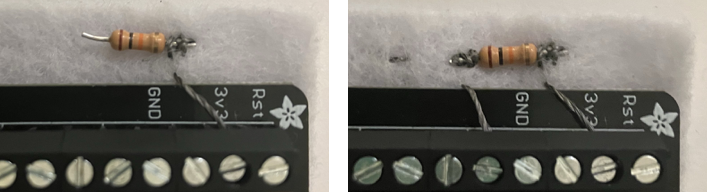
Thread your needle with conductive thread, then insert the end into the FeatherWing’s 3V3 slot (left, 2nd from the top). Secure by tightening the slot’s corresponding screw. Then sew a line towards the resistor’s top lead and wrap around several times. Cut and tie off the thread at the back.
Repeat the process with the FeatherWing’s A0 slot (left, under GND) and attach to the other end of the resistor.
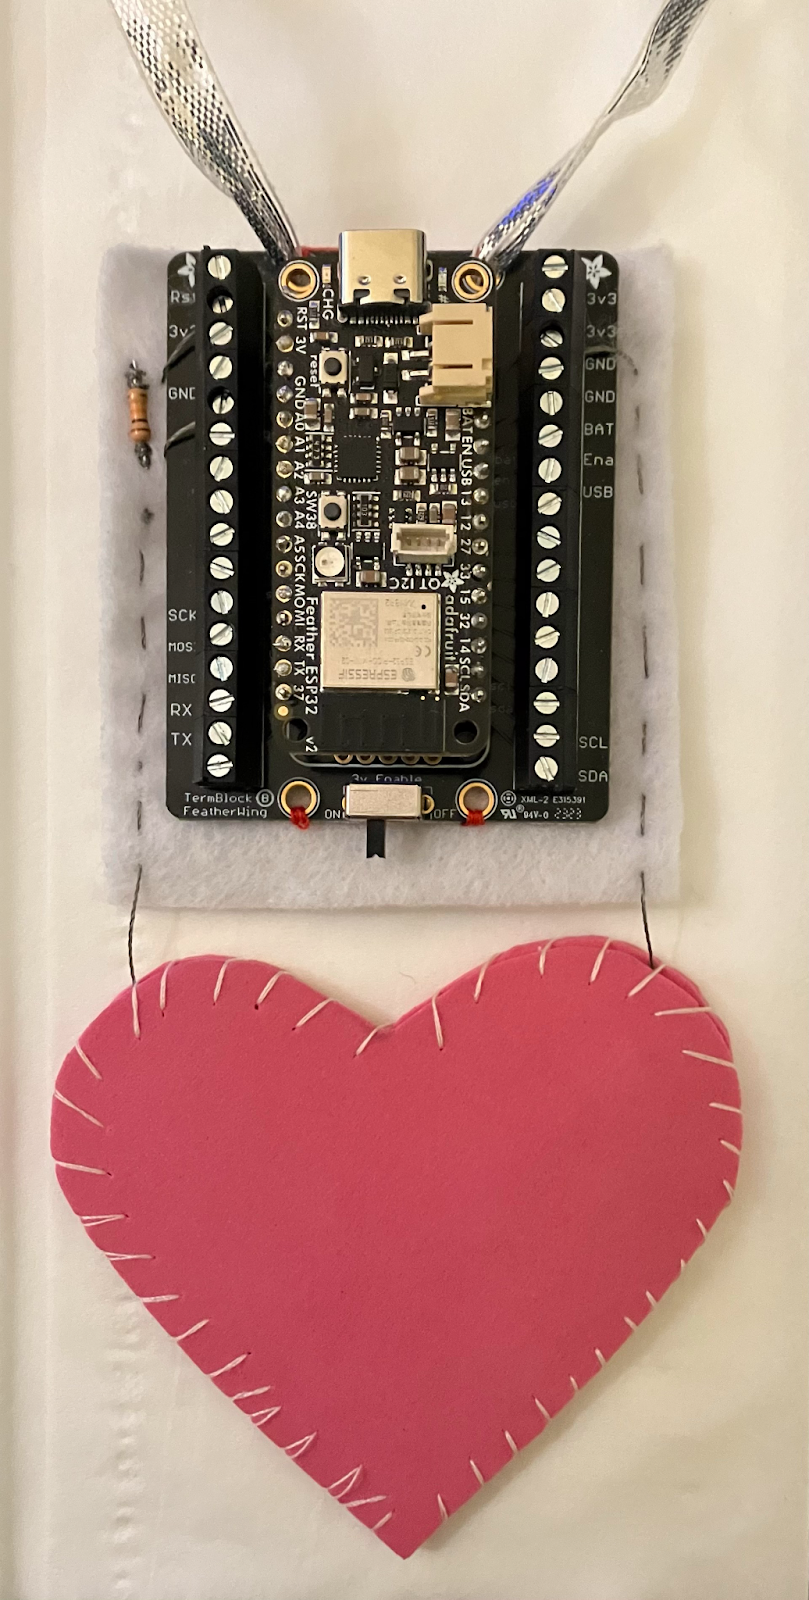
Step 5: Attach heart.
Using the left over conductive thread on your heart pressure sensor, sew the right end up to GND and secure it in its slot. Then sew the left end up to the resistor (end attached to A0).
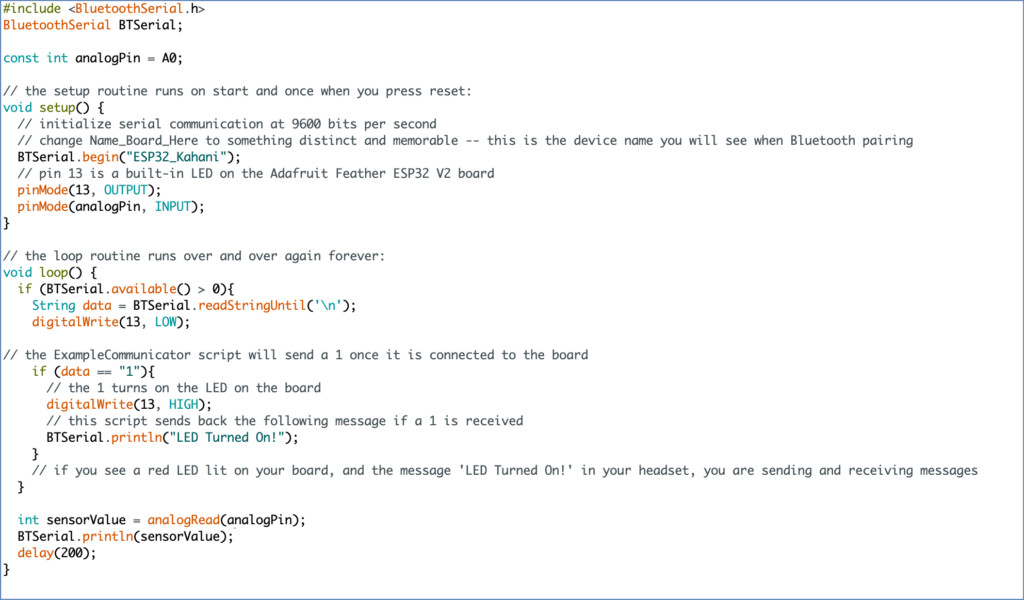
Step 6: Write and upload Arduino script.
Plug in the ESP board to your laptop and open up the Arduino IDE. Duplicate the setup example script into a new file and make the following changes.
Before setup() add:
const int analogPin = A0;
Within void setup() change line 8 with your board name:
BTSerial.begin(“Your_Board_Name”)
At the end of void setup() add:
pinMode(analogPin, INPUT);
At the end of void loop() add:
int sensorValue =analogRead(analogPin);BTSerial.println(sensorValue);;
delay(200)
Following the setup guide, select “Adafruit ESP V2 board” and the correct port. Then upload your script.
At this point you can unplug your board and connect your battery so you may wear your controller. Using two M-M wires, connect the 3.7V battery’s power and ground to the TermBlock FeatherWing’s empty 3.3V and GND slots. Secure by tightening the screws and slide the battery into the back pocket of your controller.
Part 3: Unity
Step 1: Download and extract “Pressure_Example_Base” Project from the link below.
Step 2: Open project in Unity.
In Unity Hub, press open and select the extracted folder (actual project folder may be inside the extracted folder). Make sure this opens with Unity version 3.22.14.
Step 3: Set Up Singularity
The “Pressure_Example_Base” project is similar to the “BiX_Quicksetup” in Workshop 1, except for a few environment changes. Most noticeably this example is fully in VR and includes a mirror object. Locate the BluetoothCommunicator object and enter your board’s name in the inspector.

Step 4: Test controller in unity
Before proceeding, let’s test our controller. Build and Run the scene and connect your controller as per the instructions in Workshop 1.
We will then check the pressure data via Android Logcat in Unity. If not downloaded, go to the top nav bar, Window -> Package Manager -> Packages: Unity Registry -> Sear Android Logcat -> Install. After downloading Android Logcat can be opened via Window -> Analytics -> Android Logcat. Under Device select your Oculus.
Initially you will be overloaded with many messages, however you can filter these via the search bar. Type “message received” to only show messages from our onMessageRecieved() function within the ExampleCommunicator script. If nothing comes up try clicking reconnect in the Android Logcat and restarting the build in your headset
Make note of how the value changes. What is it at rest? What is it when fully pressed? If using a 10K Ohm resistor, these values should be around 4095 at rest and 0 when pressed hard. These values can vary on many factors so it is good to check what they are for you.

Step 5: Add script to ExampleCommunicator
Back in Unity, open up the ExampleCommunicator script and make the following additions:
Before the Start() function add:
// public static variables are accessible to other scripts
public static pressure;
At the beginning of the onMessageRecieved() function add:
// int.Parse converts a numbered string into an integer value
pressure=int.Parse(message);
Save the script and return to Unity.
Step 4: Create heart object
- Locate the heart object in assets, then drag into your scene.
- In the Transform window, rescale X, Y, and Z to 20.
- Click add component in the Inspector Window and search for Parent Constraint.
- Add a source by clicking the plus sign. Then locate the Main Camera object (Complete XR Origin Set Up Variant -> XR Origin (XR Rig) -> Camera Offset -> Main Camera. Drag this object into the source box.
- Click zero to snap the heart to the Main Camera.
- Under Constraint Settings, unlock and change Position At Rest -> Y to 0.4. This should automatically adjust the Position Offset -> Y to -0.5
- Make sure X, Y, and Z are checked under Freeze Position Axes and Freeze Rotation Axes.
- Click Activate to finish.

Step 6: Create underPressure script
Click add component and type “underPressure”. This will prompt you to create a new script of the same name.
Double click the generated script to open in a code editor
Assets -> underPressure OR click the script name in inspector
Before the Start() function. Create the following three variables:
// variables declared outside functions are variables all functions can access int p=0;Vector3 originalScale;float xScale;
Initialize these variables within the Start() function:
p=0
// original scale values to use as reference later
originalScale = transform.localScale;
xScale = originalScale.x;
In the Update() function, write the following:
// update p to be equal to the pressure value received by the ExampleCommunicator
p=ExampleCommunicator.pressure;
// 4000 is roughly the baseline value of our sensor
// change 4000 to whatever value baseline is for you
if (p>4000) {
    // if p is greater than 4000, the sensor is not pressed, reset the scale
    transform.localScale = originalScale;
} else {
    // calculate new size by changing the scale according to how pressure is applied
    float newSize = xScale/3 + (xScale*2/3)*(p/4000f);
    // apply size change
    transform.localScale = new Vector3(newSize,newSize,newSize);
}
“float newSize = xScale/3 + (xScale*2/3)*(p/4000f)” explained: the new size is at least ⅓ of the original size. How much of the remaining ⅔ are re-added depends on what percent of pressure is NOT applied. If no pressure is applied (4000), 100% of the ⅔ are added back. If max pressure is applied (0), 0% of the ⅔ are added back. This algorithm allows for a relatively smoother change in size according to the changing pressure. Additionally, coding the shape changes this way means the script will adapt to whatever scale is set in Unity.
Step 7: Build and Run
Build and Run as usual. In your headset, as you press down on your heart, your body will become smaller.

Bonus Part 4: Add Heart Beat
Step 1: Add an Audio Source component to your heart object.
In the inspector window of your heart object, search for the component “Audio Source”. In Unity, an audio source component is what allows an audio file to be played. Usually you would set the audio file directly in this component. However, to mimic a heartbeat, we will be using two audio files that will switch in our script.

Step 2: Edit underPressure.
Reopen your underPressure script and make the following additions:
Before the Start() function add the following variables:
// public variables are assigned a value in the inspector
// AudioClip variables are used for audio files
public AudioClip beat1;
public AudioClip beat2;
// count variables to track the pressure sensor’s state
int pressCount;
int releaseCount;
Initialize your new variables in the Start() function:
// initialize count variables
pressCount=0;
releaseCount=0;
Add if statements within if (p>4000) {…} and else {…}:
if (p>4000) {
    …
    // releaseCount ensures the audio code only runs the first time
    // the pressure sensor is released
    if (releaseCount==0) {
        // switch audio clip
        GetComponent<AudioSource>().clip = beat1;
        // play new audio clip
        GetComponent<AudioSource>().Play();
        // reset pressCount
        pressCount=0;
    }
    // + 1 to release count
    releaseCount++;
} else {
    …
    // pressCount ensures the audio code only runs the first time
    // the pressure sensor is pressed
    if (pressCount==0) {
        // switch audio clip
        GetComponent<AudioSource>().clip = beat2;
        // play new audio clip
        GetComponent<AudioSource>().Play();
        // reset releaseCount
        releaseCount=0;
    }
    // + 1 to press count
    pressCount++;
}
Step 3: Connect audio files.
Locat beat1 and beat2 audio files within the project’s assets folder. Drag these into your underPressure component.

Step 4: Build and Run
Build and Run as usual. In your headset, when you press and release your heart sensor, you will hear a heartbeat.
Example tutorial by Kahani Ploessl